
STORE OPTIMIZATION

How
to Create a High-Converting Shopify Checkout Experience
Your Shopify checkout is where intentions become transactions but all too often, it's also where sales fall apart. With checkout abandonment rates averaging around 70%, enhancing your checkout experience is one of the highest-leverage actions you can take to grow revenue.
For many Shopify store owners, the checkout process is the most overlooked stage of the customer journey. You might have an attractive store design, compelling product descriptions, and even effective marketing campaigns driving traffic but if your checkout isn’t optimized, all of that effort can go to waste.
Studies consistently show that cart abandonment rates average around 70% across eCommerce, which means that seven out of ten shoppers who add an item to their cart never complete the purchase. The reasons behind this are often linked to friction at checkout: too many steps, lack of payment options, confusing layouts, or hidden fees that frustrate potential buyers.
The checkout page is where your customer makes the final decision to trust you with their money, so optimizing it is not optional it’s essential. A smooth, fast, and reassuring checkout process can significantly increase your conversions and revenue, turning hesitant visitors into loyal customers.
Think about your own online shopping habits. How many times have you abandoned a cart because the process felt too long, required unnecessary details, or lacked your preferred payment method? Your customers feel the same way. A high-converting checkout isn’t about adding fancy graphics or overwhelming buyers with upsells it’s about simplicity, speed, and trust.
The goal is to remove as many barriers as possible between your customer and the “Place Order” button. This involves streamlining form fields, providing multiple secure payment options, optimizing for mobile, and adding trust signals like SSL certificates or security badges.
When done right, checkout optimization not only boosts conversions but also improves customer satisfaction, encouraging repeat purchases and word-of-mouth referrals. In this guide, we’ll walk through the essential elements of a high-converting Shopify checkout and give you actionable strategies you can apply today to stop losing sales at the final step.
Here’s an in-depth, research-backed guide to creating a smooth, trustworthy,
and conversion-focused checkout that keeps buyers moving to “Order Confirmed.”
1. Keep It Simple:
Reduce Steps, Remove Barriers
Shopper patience is low Shopify stores
see abandonment when checkouts are too long or complicated.
- A
survey found approx. one-third of shoppers abandon checkout when
required to create an account.
- Checkout
flows with multiple steps or unnecessary fields add friction. Baymard
Institute data shows the average checkout has over 11 fields and 5+ steps.
([turn0search4])
How to Optimize:
- Enable
Guest Checkout:
In Shopify admin, navigate to Settings → Checkout and make
account creation optional.
- Minimize
Form Fields:
Reduce to essentials: name, email, shipping, payment only. Use defaults
for “same billing address” and hide “address 2.”
- Enable
Address Autocomplete: Shopify’s built-in Google-powered autofill reduces
typing friction dramatically. ([turn0search1])
2. Enable One-Click and Express Checkout Options
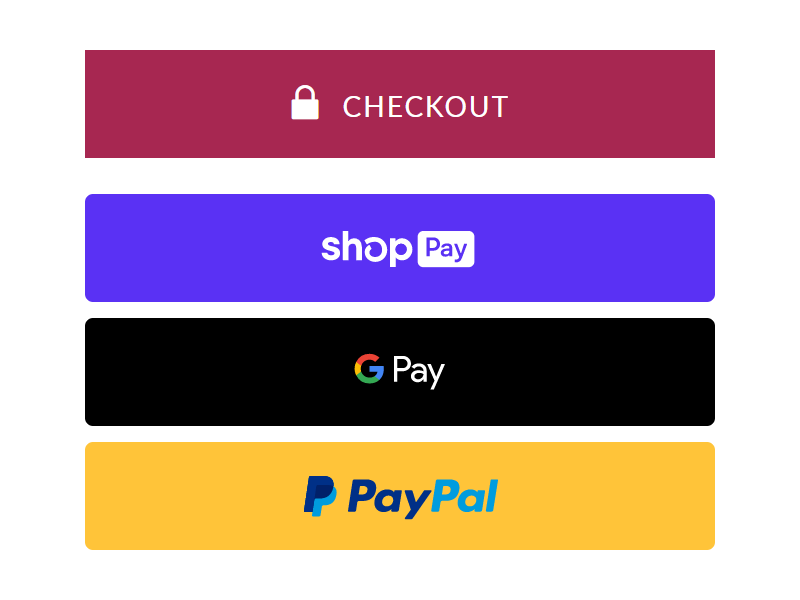
Frictionless payments reduce second-guessing and speed up conversions.
- Shop
Pay
offers one-tap checkout with stored credentials, and case studies show it boosts
conversion by up to 50%.
Setup Steps:
- Go to Settings → Payments, and enable Shop Pay (if available in your location).
- Test
checkout to ensure that returning customers can complete a purchase with a
single tap.
3. Build Trust with
Visual Cues & Security Badges
Buyers abandon at checkout when unsure
about payment security.
- Displaying
recognizable security badges (SSL, Visa, PayPal, Shop Pay)
increases trust.
Implementation:
- In
theme editor (Online Store → Themes →
Customize → Checkout), add trusted payment
icons and badges near the payment button.
- On
Shopify Plus, you can further add custom UI elements (but for most plans,
badges and branding via theme editor are sufficient).
4. Show Progress: Add
a Checkout Progress Bar

An omnipresent checkout progress indicator reduces anxiety and keeps shoppers oriented.
- Research
shows that adding a progress bar significantly increases completion rates
by giving shoppers a clear stopping point.
Tip for Shopify:
- Many
themes include a progress indicator by default; otherwise, apps or minor
theme edits can introduce a step bar (e.g., Cart →
Shipping → Payment steps).
5. Build Speed and Reliability: Optimize Performance

Checkout speed is directly tied to
trust and conversion.
- Google’s
Core Web Vitals play a major role in checkout responsiveness: aim for INP
under 200ms, LCP under 2.5s, and CLS under 0.1. ([turn0search4])
How to Improve:
- In
Shopify admin, check Online Store → Preferences → Reports → Online Store Speed.
- Remove
unnecessary checkout scripts or apps, lazy-load non-critical assets like
chat plugins.
- Compress
any hero images or replace them with optimized files (e.g., WebP).
6. Communicate Free
Shipping Thresholds Early
 |
Watch How to Add Free Shipping Bar on Shopify
- Retailers
offering free shipping noted up to 37% conversion increases and
raised cart values overall. ([turn0search1])
Shopify Setup:
- Settings → Shipping and Delivery, set a free rate for orders above your threshold (e.g., $75).
- Use
a progress bar or banner in cart and checkout (via theme or app)
that encourages hitting the threshold.
7. Offer Real-Time
Support: Live Chat or Chat-bot
Unexpected issues or questions cause
cart abandonment.
- Having
an accessible chat widget near checkout reduces this friction.
Action Steps:
- Install
a lightweight live chat app that integrates into checkout (e.g., Tidio or
Shopify Inbox).
- Only
enable in-cart or checkout interface to avoid slowing overall speed.
8. Provide Payment
& Fulfillment Choice
Payment choice comfort and shipping
flexibility dramatically reduce drop-off.
- A
study showed 7% of customers abandon checkout simply due to missing
payment options.
Setup:
- Offer at least one “accelerated” payment method (Shop Pay, Apple Pay, PayPal).
- Add multiple shipping options (standard, express).
- Clearly
display each shipping price early in the flow.
9. Leverage
Post-Purchase Upsells (Optional)
The moment after checkout is perfect
for impulse upsells.
- Post-purchase
offers generate an average 10–40% extra upsell revenue.
How to Add in Shopify: Use a post-purchase
app such as Bold Upsell or Carthook integrated via "Thank You Page"
upsell flow especially for Shopify Plus or with apps that support checkout
extensibility.
10. Keep Branding
Consistent
- Customize
fonts, colors, and logos on your checkout page via Theme editor → Checkout to match your
store’s aesthetic.
11. Utilize Shopify’s
Checkout Extensibility (Shopify Plus)
If you're on Shopify Plus, you can
insert more advanced checkout enhancements using Checkout Extensibility.
- This
is Shopify’s newest, secure method to add UI blocks, functions, or dynamic
pricing to checkout. It’s replacement for customizable checkout.
12. Checklist Recap:
Optimize Your Checkout in 12 Steps
1. Enable guest checkout
(Settings → Checkout)
2. Enable Shop Pay
3. Add trust badges and
branding in theme editor
4. Minimize fields; use
address autocompletes
5. Add checkout progress
bar
6. Enable free shipping
threshold with progress bar
7. Install lightweight
live chat for checkout help
8. Offer multiple
preferred payment methods
9. Offer shipping
options early in flow
10. Optimize page speed
(Core Web Vitals)
11. Add post-purchase
upsell (if budget allows)
12. Use branded elements
consistently
Continuous Testing
& Tracking
Key metrics to monitor:
- Checkout
conversion rate (Analytics → Conversion over
Time)
- Cart
abandonment rate (Shopify Dashboard)
- Average
order value (AOV) post-optimization
- Funnel
idle times (time spent on each checkout step)
Testing Ideas:
- Compare
abandonment % before and after guest checkout is enabled.
- Track
before/after checkout load times.
- A/B
test free shipping thresholds (e.g., $75 vs. $100).
- If possible, test post-purchase upsell effect on AOV.
Final Thoughts
Checkout optimization is a high-impact,
low-hanging fruit for Shopify merchants. Small changes like enabling guest checkout
or speeding up load times can dramatically reduce abandonment and boost
revenue.
Follow this guide closely: work through setup, test strategically, monitor your
data. A seamless checkout isn’t just nice to have it’s the difference between
browsing and buying.
A high-converting checkout experience doesn’t just happen by chance, it’s the result of intentional design and strategic thinking. By putting yourself in the shoes of your customers, you can identify where friction exists and remove it before it costs you sales. The adjustments may seem small reducing form fields, adding a guest checkout option, offering digital wallets, or making the process mobile-friendly but collectively, they can have a massive impact on your revenue.
Remember, at the checkout stage, your customers have already made the emotional decision to buy; your job is simply to make the process effortless and reassuring enough for them to complete the transaction. When you eliminate doubts, make payments convenient, and build trust through transparency, you create a seamless flow that guides buyers to that all-important “Thank You” page.
The most successful Shopify stores continuously test and refine their checkout processes. They track data on cart abandonment, monitor user behavior, and adjust their strategy to stay ahead of shifting customer expectations. Think of your checkout not as a static page but as a living system that can always be improved.
Over time, these small optimizations compound, leading to higher conversion rates, stronger customer loyalty, and increased lifetime value. The truth is, your checkout is more than just a form it’s the bridge between browsing and buying. If you invest in making it as smooth, trustworthy, and customer-friendly as possible, you’ll not only reduce lost sales but also build a store that shoppers enjoy returning to. A strong checkout experience is ultimately a strong business foundation, and once you’ve mastered this final step, you’ll be well on your way to consistent growth and success on Shopify.
Are you now ready to level up your Shopify store? bookmark this tab and apply what you've learnt. Check back for more real and working tips for your Shopify store, Comment and follow us by submitting your email for any new articles that will help your ecommerce business grow. Thank you.


0 Comments
We are happy to see your feedback